
How to Use Audience in Meta Business Manager
Table Of Contents
How to Use Audience in Meta Business Manager?
What is Audience in Meta Business Manager?
Create Custom Audience Facebook
In Meta Business Manager, the term “audience” refers to the specific groups of people that businesses target for their advertising campaigns. Meta (formerly Facebook) offers advanced tools to help advertisers reach their ideal audience by leveraging user data, including demographics, interests, behaviors, and past interactions with your business. Audiences allow businesses to tailor their marketing efforts more precisely, ensuring their ads are seen by people who are more likely to engage or convert.
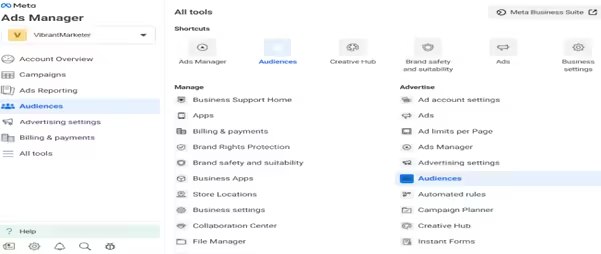
How to Use Audience in Meta Business Manager: A Step-by-Step Guide
Login to Meta Business Manager:
- Head over to Meta Business Manager and log in with your account credentials.
Access the Audiences Section:
- Once logged in, go to the Audiences section by selecting it from the main dashboard or through the Ads Manager.
Choose the Type of Audience:
- From the Audiences dashboard, click Create Audience. You will see three options: Core Audience, Custom Audience, and Lookalike Audience.
Types of Audiences in Meta Business Manager:
Custom Audience:
- A Custom Audience is created from your existing customer data. You can target people who have already interacted with your business, whether they’ve visited your website, engaged with your social media, or are part of your email list.
Lookalike Audience:
- A Lookalike Audience helps you find new people who share characteristics with your existing customers. Meta analyzes your custom audience and identifies users who are similar, helping you expand your reach to potential new customers.
Saved Audience:
- A Saved Audience is a preset group you create based on criteria like age, gender, interests, location, and behaviors. These audiences are defined manually and saved for future ad campaigns.
Creating a Custom Audience:
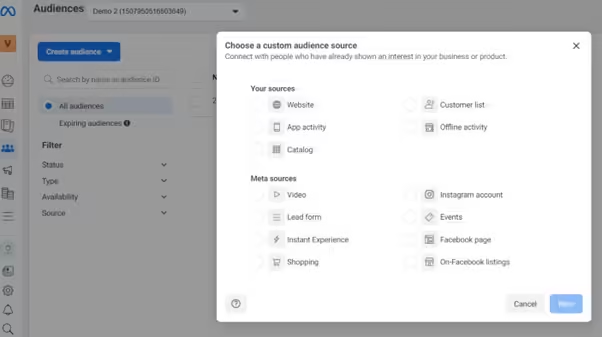
Select Custom Audience:
- Go to Create Audience > Custom Audience.
Choose Your Data Source:
- You’ll need to pick a data source for your custom audience:
- Website Traffic: Target people who visited your website or specific pages.
- Customer File: Upload your customer data, such as an email list.
- App Activity: Use data from people who have engaged with your mobile app.
- Engagement: Target people who have engaged with your Facebook or Instagram posts, videos, or ads.
- You’ll need to pick a data source for your custom audience:
Upload Data (if necessary):
- For options like customer files, you’ll need to upload a CSV or Excel file with user information like email addresses or phone numbers.
Define Your Audience Rules:
- For example, if you chose website traffic, specify which website visitors you want to target (e.g., people who visited in the last 30 days or those who visited a specific product page).
Name and Save Your Audience Give your audience a name and click Create.
Creating a Lookalike Audience:
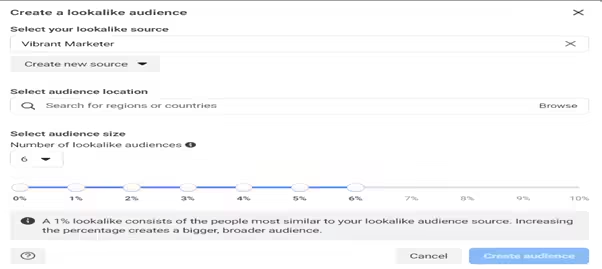
Select Lookalike Audience:
- From the Create Audience dropdown, choose Lookalike Audience.
Select Your Source Audience:
- Choose an existing Custom Audience or Page fans as the base group from which Meta will find lookalike users.
Choose Target Location:
- Pick the region or country where you want to target people.
Set the Similarity Range:
- Meta will let you select how similar the lookalike audience should be. A 1% lookalike will be the closest match to your existing customers, while a higher percentage means the audience will be broader but less similar.
Create Audience:
- Once you’ve configured everything, click Create Audience.
Creating a Saved Audience:

Select Saved Audience:
- From the Create Audience dropdown, choose Saved Audience.
Define Demographics:
- You can manually choose your audience’s demographics, including:
- Location: Target specific cities, regions, or countries.
- Age & Gender: Define age range and gender.
- Languages: Choose the language(s) your audience speaks.
- You can manually choose your audience’s demographics, including:
Interests and Behaviors:
- Select interests and behaviors based on things like hobbies, shopping habits, job titles, etc.
Save the Audience:
- After entering all your criteria, give your audience a name (e.g., “Tech-Savvy Shoppers”) and save it for future campaigns.
Example: Creating a Custom Facebook Audience from Website Visitors
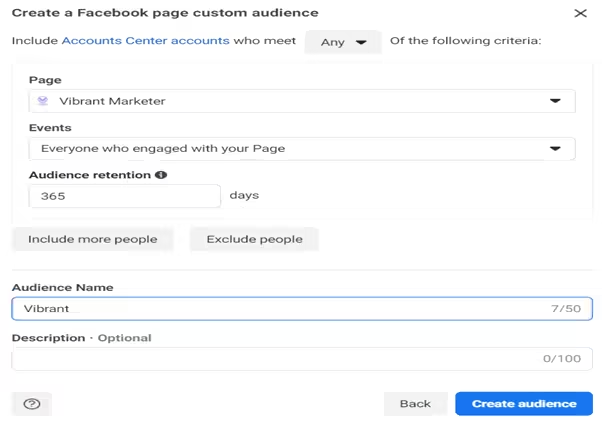
Let’s say you want to create a custom audience based on people who visited your website.
- Login and head to Audiences.
- Click Create Audience and select Custom Audience.
- Choose Website Traffic as the source.
- Select which website visitors you want to target, such as “People who visited specific pages.”
- Set the time window (e.g., past 30 days).
- Give your audience a name (e.g., “Website Visitors – Last 30 Days”).
- Click Create Audience
Why Using Audiences is Important:
- Personalized Ads: Targeting specific groups means you can create more relevant and personalized ads, leading to higher engagement and conversion rates.
- Maximizing Ad Spend: By reaching the right audience, you avoid wasting money on ads shown to people who are unlikely to take action.
- Enhanced Insights: After running campaigns with different audiences, you’ll gather valuable insights about which groups respond best, helping you refine your strategies over time
Final Thoughts: How to use audience in meta business manager
Meta Business Manager’s audience tools allow businesses to reach potential customers in a highly targeted way. Whether you’re building a core audience based on interests or creating advanced custom and lookalike audiences, these steps will help you get started with using audiences effectively for your campaigns.
Share this post
Recent Posts


